Saturday, December 13, 2014

Thursday, December 11, 2014
Native American Style Beaded Earrings
Native American Style Beaded Earrings

I am
so glad to have a chance to learn about Native American jewelry pieces.
There are two very general categories of Native American jewelry: metalwork, and beadwork.
Traditional Indian
jewelry used materials such as beads, shells, copper and silver, ivory, amber,
turquoise and other stones. After colonization, Native American jewelry-making
traditions remained strong, incorporating, rather than being replaced by new
jewelry materials and techniques such as glass beads and more advanced
metalworking techniques.
My favorite material is a seed bead
and my favorite technique is bead weaving, using special needles and thread.
I am lucky to see a real American
tribes and visit a stores were you can find oringinal jewelry pieces made by Native Americans. I am very exited when I can
observe their culture.
One day I’ve decided to make
something by myself. This was my first experience with it.


This is a Southwest style Earrings
I made and I love it so much!
Materials:
·
size 11\0 seed
beads 3 colores: turquoise, black and
metallic silver
·
#5 silver bugle
beads
·
Beading needle
·
FireLine 0.006”
·
Ear wire


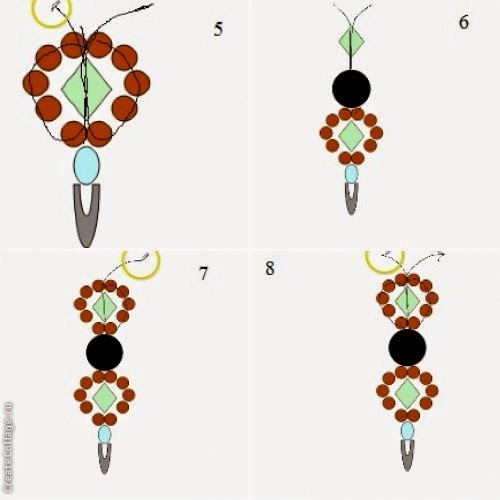
I start with 7 seed beads. Leave a tail long
enough to secure. Then, go through the first 4 seed beads again. Pull it tight.


Then, exit the thread as shown for the next row.

When this part is completed, exit the thread through the seed bead on
the edge.

String a seed beads according the pattern. Attach this line to the last 3 seed beads on
the opposite side of the row and exit the thread through the next 3 seed beads.

If you have any questions you can watch my video tutorial.
If you want to have your own pdf written tutorial https://www.etsy.com/listing/190537468/pdf-seed-bead-beaded-earrings-swarovski?
Tuesday, December 2, 2014
Necklace with Twin Beads
Necklace with Twin Beads

Material list:
Twin Beads 3 colors;
11\0 Seed Beads 2 colors;
Beading needle;
FireLine 0.008”
Clasp
2 wire protector
2 jump rings.

I saw pictures of many beaded projects made
with twin Beads. They appeared so gorgeous. I wondered how people could be so
skillful using this stubborn material. So, I’ve decided to try this material to
create something for myself.

If you are going to try to make this necklace you probably better check this video,in this video I speak my native language. Some people really need to see the diagram; therefore, I posted it for better visualization.

Every new line exists separately but are still connected with the previous line. The pattern is very sensitive to the size of the seed beads and twin beads. If the shape is not perfect you may need to make an adjustment.

Monday, December 1, 2014
How to make a Crystal Bracelet. Simple Beading.
How to make a Crystal Bracelet. Simple Beading.

Materials:
46 size 6mm crystals;9 size 8mm round beads;
11\0 seed beads;
FireLine;
2 needles;
2 jump rings;
2 wire protectors.
Thread two needles with 2m of FireLine. Go through a wire protector with one needle. Cross both needles through an 8\0 seed bead. Equalize two parts of thread.
Go with both needles through a 6mm crystal. Then string 5 seed beads on each needle. Go around and back through the 6mm crystal.

Go through an 8mm round bead and 6mm crystal with both needles.
String 5 seed beads on each needle. Go around through the 6mm crystal
Repeat this Step for the entire length. Then attach a wire protector.
Go through the 6mm crystal and exit the thread through the 1st seed bead. String a 6mm crystal, 2 seed beads and a crystal. Pass through the next section 1st seed bead and through the 6mm crystal and exit the thread through the 1st seed bead on the opposite side.
http://beadsmadness.hubpages.com/
Repeat this Step for the entire length on both sides. Secure and cut the thread.

.png)
http://beadsmadness.hubpages.com/
Repeat this Step for the entire length on both sides. Secure and cut the thread.
Saturday, November 29, 2014
How to make Beaded Earrings with Swarovski Crystals
How to make Beaded Earrings with Swarovski Crystals

Materials:
30 size
4mm Swarovski bicone beads;
12 size
3mm Swarovski pearls;
11\0
seed beads;
2 ear
wires;
Thread
FireLine 0.006”;
Beading needle.
This is
a little different design than my other projects. First build a base using seed
beads, this can be of any shape or size that you would like. The second step is
to decorate this base with any color, shape or size of beads that you prefer. This method can be adapted for making earrings,
bracelets, or even necklaces. I will first show you an easy project of how to
make earrings using this method.
Step 1: Thread your needle with 1.1m of FireLine. String 6
seed beads. Go through the first 3 seed beads again leaving a tail about 6-9cm.
Pull the thread forming a circle.
Pick up a
seed bead. Pass through the next seed bead and pull the thread. Do it 5 more
times adding 5 more new seed beads.

String 4
seed beads. Skip one seed bead and pass through the next seed bead. Repeat it 5
more times.
Complete the circle
and exit the thread through the 2nd seed bead of the first added
4seed beads

Pick up a
seed bead. Pass through the next 5 seed beads. Repeat it 5 more times.
Exit the thread through the first seed bead added in this row.
There is only a slight difference
between the 2 methods we just added seed beads: you add 5 seed beads at a time
or step by step adding 4 seed beads and then go around again to add 1 more seed
bead in the middle. I like the second way because it gives the piece a better
shape.


Step 2: String a seed bead, a 3mm pearl and a seed bead. Try
to follow to the line as it shown on the diagram. Pull the thread.

String a
seed bead, a 4mm bicone and a seed bead. Pass through the seed bead added in the 1st line, in the opposite
direction. Go back through the line of seed beads and 4mm bicone. Then, turn
through the seed bead the thread exited and through the next 3 seed beads.


Repeat this Step five more times.
You can make a hook and attach your earring to an ear wire
or add couple more elements. Here is how I finished my work.

Saturday, November 15, 2014
Swarovski Crystals Beaded Ring DIY
Swarovski Crystals Beaded Ring DIY

Materials:
- 8 Swarovski crystal, blue shade, 3.8-4mm roses montées;
- Swarovski crystal rhinestone, 12 mm faceted rivoli, blue shade;
- Seed beads size 11 Crystal Brown;
- 2 beading needles;
- FireLine 0.006” crystal clear.
Then, repeat this Step placing 7 more new montees: string 2 seed beads with right needle and cross both needles through a new montees
Add the last 2 seed beads and cross both needles through the 1st montees. Exit the right needle through the 1st seed bead.
Add a seed bead between two seed beads in every odd section using the right needle only
https://www.etsy.com/shop/BeadsMadness?ref=hdr_shop_menu

Exit the thread through the 1st seed bead we added.
String 3 seed beads and pass through the seed beads as shown.
Add 3 more seed beads and go through the next middle seed bead.

Complete the circle. Add a seed bead and go through the nearest seed bead. Pick up a seed bead and go through seed beads as shown. https://www.facebook.com/diy.jewerly
The next Step: string 3 seed beads, skip the seed bead and go through the next one. Then add 8 seed beads passing through the middle seed bead of the 3 just added


https://www.etsy.com/listing/208511118/pdf-tutorial-swarovski-beaded-earrings?
Thursday, October 9, 2014
Triple Shamballa Bracelet
Triple Shamballa Bracelet

Materials:
Cord 1mm diameter
Charms
Spacers 8mm
2 jump ring
clasp
First – cut 12 lengths of cord, 6 about 17 inches long, and
6 about 35 inches long.
.png)
.png)
Secure
the ends with the lighter.
.png)
.png)
Tape
the cord onto the work surface to prevent moving.
.png)
Fold in half a 33” cord.
.png)
.png)
Pass left over the loop

.png)
Pull both sides of the thread.
.png)
.png)
.png)
Pass left strand through the loop made by right strand.
1.png)
Pull it tight.
.png)
Repeat it 17 more times.
.png)
.png)
.png)
Repeat it with a watch using 2 strands 17” long and 2
strands 35” long. You can add 4 spacers on each side.
.png)
.png)
.png)
.png)
.png)
Make the third line.
.png)
.png)
Glue
the ends
.png)
Cut the ends.
.png)
.png)
Place into the clasp.
.png)
.png)
Attach a clasp and a jump ring.
.png)
.png)
Subscribe to:
Posts (Atom)